Cylinder
圓柱體 (Cylinder) 為一二次曲面,並滿足以下直角坐標系之方程式:
若圓柱體的半徑為,高度為,則其體積為,表面積為。
除了標準的圓柱體方程式之外,尚有以下之類型:
- 虛橢圓柱體 (Imaginary Elliptic Cylinder):.
- 雙曲圓柱體 (Hyperbolic Cylinder):.
- 拋物圓柱體 (Parabolic Cylinder):.
請參考以下範例。
程式說明
範例示範以TriangleMesh類別依序設定頂點座標、貼圖座標與三角形所組成的面,藉此組成圓柱體 (Cylinder)。
步驟一:設定頂點座標與貼圖座標。
圓柱體較立方體為複雜,首先設定圓柱體的頂點座標與貼圖座標:
final int nPoints = divisions * 2 + 2;
final int nTexCoords = (divisions + 1) * 4 + 1;

float textureDelta = 1.f / 256;

float dA = 1.f / divisions;
height *= .5f;

float points[] = new float[nPoints * 3];
float texcoords[] = new float[nTexCoords * 2];

int pPos = 0, tPos = 0;

for (int i = 0; i < divisions; ++i) {
  double a = dA * i * 2 * Math.PI;

  points[pPos + 0] = (float) (Math.sin(a) * radius);
  points[pPos + 2] = (float) (Math.cos(a) * radius);
  points[pPos + 1] = height;
  texcoords[tPos + 0] = 1 - dA * i;
  texcoords[tPos + 1] = 1 - textureDelta;
  pPos += 3; tPos += 2;
}

// Top Edge
texcoords[tPos + 0] = 0;
texcoords[tPos + 1] = 1 - textureDelta;
tPos += 2;

for (int i = 0; i < divisions; ++i) {
  double a = dA * i * 2 * Math.PI;
  points[pPos + 0] = (float) (Math.sin(a) * radius);
  points[pPos + 2] = (float) (Math.cos(a) * radius);
  points[pPos + 1] = -height;
  texcoords[tPos + 0] = 1 - dA * i;
  texcoords[tPos + 1] = textureDelta;
  pPos += 3;
  tPos += 2;
}

// Bottom Edge
texcoords[tPos + 0] = 0;
texcoords[tPos + 1] = textureDelta;
tPos += 2;

// Add Cap Central Points
points[pPos + 0] = 0;
points[pPos + 1] = height;
points[pPos + 2] = 0;
points[pPos + 3] = 0;
points[pPos + 4] = -height;
points[pPos + 5] = 0;
pPos += 6;

// Add Cap Central Points
// Bottom Cap
for (int i = 0; i <= divisions; ++i) {
  double a = (i < divisions) ? (dA * i * 2) * Math.PI: 0;
  texcoords[tPos + 0] = (float) (Math.sin(a) * 0.5f) + 0.5f;
  texcoords[tPos + 1] = (float) (Math.cos(a) * 0.5f) + 0.5f;
  tPos += 2;
}

// Top Cap
for (int i = 0; i <= divisions; ++i) {
  double a = (i < divisions) ? (dA * i * 2) * Math.PI: 0;
  texcoords[tPos + 0] = 0.5f + (float) (Math.sin(a) * 0.5f);
  texcoords[tPos + 1] = 0.5f - (float) (Math.cos(a) * 0.5f);
  tPos += 2;
}

texcoords[tPos + 0] = .5f;
texcoords[tPos + 1] = .5f;
tPos += 2;

// 建立TriangleMesh
TriangleMesh trianglemesh = new TriangleMesh();
// 設定頂點座標
trianglemesh.getPoints().addAll(points);
// 設定貼圖座標
trianglemesh.getTexCoords().addAll(texcoords);
...
步驟二:以頂點組成三角形的面。
接著以getFaces().addAll()方法依頂點與貼圖的序號組成圓柱體的各個面:
final int nFaces = divisions * 4;
int faces[] = new int[nFaces * 6];
int fIndex = 0;

// Faces
for (int p0 = 0; p0 < divisions; ++p0) {
  int p1 = p0 + 1;
  int p2 = p0 + divisions;
  int p3 = p1 + divisions;

  faces[fIndex+0] = p0;
  faces[fIndex+1] = p0;
  faces[fIndex+2] = p2;
  faces[fIndex+3] = p2 + 1;
  faces[fIndex+4] = p1 == divisions ? 0 : p1;
  faces[fIndex+5] = p1;
  fIndex += 6;

  faces[fIndex+0] = p3 % divisions == 0 ? p3 - divisions : p3;
  faces[fIndex+1] = p3 + 1;
  faces[fIndex+2] = p1 == divisions ? 0 : p1;
  faces[fIndex+3] = p1;
  faces[fIndex+4] = p2;
  faces[fIndex+5] = p2 + 1;
  fIndex += 6;
}

// build cap faces
int tStart = (divisions + 1) * 2;
int t1 = (divisions + 1) * 4;
int p1 = divisions * 2;
...
// 設定各三角形的面
trianglemesh.getFaces().addAll(faces);
...
步驟三:設定各面的平滑參數。
平滑參數主要運用於使相鄰兩面邊緣平滑化,避免不規則鋸齒狀的現象,平滑參數預設為1。以getFaceSmoothingGroups().addAll()方法設定各面的平滑參數:
// 設定各面的平滑參數
int smoothing[] = new int[nFaces];

for (int i = 0; i < divisions * 2; ++i) {
  smoothing[i] = 1;
}

for (int i = divisions * 2; i < divisions * 4; ++i) {
  smoothing[i] = 2;
}

trianglemesh.getFaceSmoothingGroups().addAll(smoothing);
...
最後以MeshView類別建立圓柱體:
// 建立MeshView
MeshView meshview;

meshview = new MeshView(createMesh(120, 250, 100));
...
執行結果
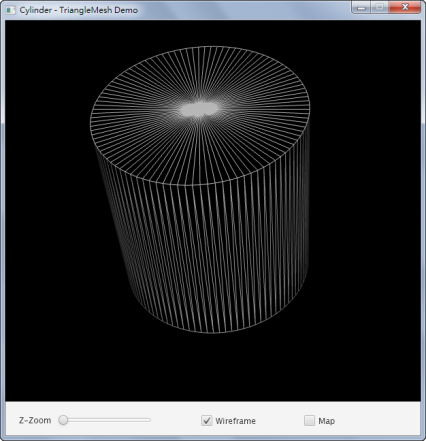
以下是以線框的方式繪製圓柱體:

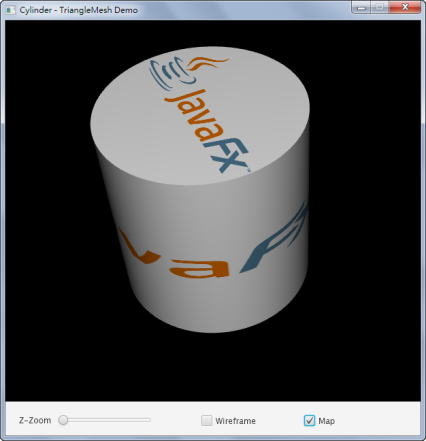
以下是以貼圖的方式繪製圓柱體:
